760 – Horizontal and Vertical Alignment BasicsThe general idea of the HorizontalAlignment and VerticalAlignment properties, for objects that inherit from FrameworkElement, is to indicate how the element is positioned within the space that the parent panel provides, after accounting for any margins. Different values for HorizontalAlignment and VerticalAlignment only lead to different layout if the parent panel provides more room than the child element requires, in the corresponding dimension. In the grid shown below: - Labels in the 1st row have HorizontalAlignment set to Left
- Labels in 2nd row have HorizontalAlignment set to Center
- Labels in 3rd row have HorizontalAlignment set to Stretch
- 1st column width is set to Auto–make wide enough for largest item
- 2nd column width takes up remaining space
Things to note: - Labels in 2nd column have more room, so horizontal alignment results in different behavior
- 1st column sizes to fit 2nd row, so horizontal alignment doesn’t always apply
411 – Use HorizontalAlignment and VerticalAlignment to Position Child Elements within a GridBy default, the HorizontalAlignment and VerticalAlignment properties of child elements in a Grid are set to Stretch. This value indicates that the child element should be sized to fit the containing cell. In the example below, the labels and the button are all stretched to fit the containing cells. You can set the alignment properties to other values, however. HorizontalAlignment can be set to Stretch, Left, Center or Right. VerticalAlignment can be set to Stretch, Top, Center or Bottom. <Label Grid.Row="0" Grid.Column="0" Content="Larry" Margin="5" Background="Lavender" HorizontalAlignment="Center" />
<Label Grid.Row="0" Grid.Column="1" Content="Moe" Margin="5" Background="Magenta" VerticalAlignment="Center" />
The “Larry” label is still stretched vertically, but now centered horizontally. The size of the label is also adjusted to fit the content. The “Moe” label is still stretched horizontally, but now centered vertically.
332 – HorizontalContentAlignment and VerticalContentAlignment Are Sometimes Not RelevantThe HorizontalContentAlignment and VerticalContentAlignment properties, used to align a control’s content within the interior of the control, only make sense if the control is not automatically sizing to fit its content. In the example below, all three buttons have their HorizontalContentAlignment property set to Right. The first button has the default value for its HorizontalAlignment property (Stretch), so you can see the content of the button aligned to the right. The other two buttons are not stretched, so their width is set to fit their content. For these buttons, setting the HorizontalContentAlignment property doesn’t have any visible effect. <StackPanel>
<Button Content="HorizontalAlignment=Stretch (Default)" HorizontalContentAlignment="Right"/>
<Button Content="HorizontalAlignment=Left" HorizontalAlignment="Left" HorizontalContentAlignment="Right"/>
<Button Content="HorizontalAlignment=Right" HorizontalAlignment="Right" HorizontalContentAlignment="Right"/>
</StackPanel>
321 – HorizontalAlignment and VerticalAlignmentThe HorizontalAlignment and VerticalAlignment properties specify how child controls should be located and sized within their parent container. By default, controls placed in a vertically oriented StackPanel are stretched horizontally to fill the width of the StackPanel. The StackPanel container sizes its child elements this way because the children’s HorizontalAlignment property is set to Stretch by default. We can override this behavior by setting HorizontalAlignment to Left, Center or Right. The control will then be aligned as indicated and the width set to fit the content. An Avalonia control exposes several properties that are used to precisely position child elements. This topic discusses four of the most important properties: HorizontalAlignment, Margin, Padding, and
<Button HorizontalAlignment="Left">Button 1 (Left)</Button>
<Button HorizontalAlignment="Right">Button 2 (Right)</Button>
<Button HorizontalAlignment="Center">Button 3 (Center)</Button>
<Button HorizontalAlignment="Stretch">Button 4 (Stretch)</Button>
0. The effects of these properties are important to understand, because they provide the basis for controlling the position of elements in Avalonia applications. Introduction to Element PositioningThere are numerous ways to position elements using Avalonia. However, achieving ideal layout goes beyond simply choosing the right
<Button HorizontalAlignment="Left">Button 1 (Left)</Button>
<Button HorizontalAlignment="Right">Button 2 (Right)</Button>
<Button HorizontalAlignment="Center">Button 3 (Center)</Button>
<Button HorizontalAlignment="Stretch">Button 4 (Stretch)</Button>
1 element. Fine control of positioning requires an understanding of the HorizontalAlignment, Margin, Padding, and
<Button HorizontalAlignment="Left">Button 1 (Left)</Button>
<Button HorizontalAlignment="Right">Button 2 (Right)</Button>
<Button HorizontalAlignment="Center">Button 3 (Center)</Button>
<Button HorizontalAlignment="Stretch">Button 4 (Stretch)</Button>
0 properties. The following illustration shows a layout scenario that utilizes several positioning properties. At first glance, the
<Button HorizontalAlignment="Left">Button 1 (Left)</Button>
<Button HorizontalAlignment="Right">Button 2 (Right)</Button>
<Button HorizontalAlignment="Center">Button 3 (Center)</Button>
<Button HorizontalAlignment="Stretch">Button 4 (Stretch)</Button>
6 elements in this illustration may appear to be placed randomly. However, their positions are actually precisely controlled by using a combination of margins, alignments, and padding. The following example describes how to create the layout in the preceding illustration. A
<Button HorizontalAlignment="Left">Button 1 (Left)</Button>
<Button HorizontalAlignment="Right">Button 2 (Right)</Button>
<Button HorizontalAlignment="Center">Button 3 (Center)</Button>
<Button HorizontalAlignment="Stretch">Button 4 (Stretch)</Button>
7 element encapsulates a parent
<Button HorizontalAlignment="Left">Button 1 (Left)</Button>
<Button HorizontalAlignment="Right">Button 2 (Right)</Button>
<Button HorizontalAlignment="Center">Button 3 (Center)</Button>
<Button HorizontalAlignment="Stretch">Button 4 (Stretch)</Button>
8, with a Padding value of 15 device independent pixels. This accounts for the narrow
<Border Background="LightBlue" BorderBrush="Black" BorderThickness="2" Padding="15">
    <Grid Background="White" ShowGridLines="True">
      <Grid.RowDefinitions>
        <RowDefinition Height="25"/>
        <RowDefinition Height="50"/>
        <RowDefinition Height="50"/>
        <RowDefinition Height="50"/>
        <RowDefinition Height="50"/>
      </Grid.RowDefinitions>
      <TextBlock Grid.Row="0" Grid.Column="0"
                 FontSize="18"
                 HorizontalAlignment="Center">
        VerticalAlignment Sample
      </TextBlock>
      <Button Grid.Row="1" Grid.Column="0" VerticalAlignment="Top">Button 1 (Top)</Button>
      <Button Grid.Row="2" Grid.Column="0" VerticalAlignment="Bottom">Button 2 (Bottom)</Button>
      <Button Grid.Row="3" Grid.Column="0" VerticalAlignment="Center">Button 3 (Center)</Button>
      <Button Grid.Row="4" Grid.Column="0" VerticalAlignment="Stretch">Button 4 (Stretch)</Button>
    </Grid>
</Border>
0 band that surrounds the child
<Button HorizontalAlignment="Left">Button 1 (Left)</Button>
<Button HorizontalAlignment="Right">Button 2 (Right)</Button>
<Button HorizontalAlignment="Center">Button 3 (Center)</Button>
<Button HorizontalAlignment="Stretch">Button 4 (Stretch)</Button>
8. Child elements of the
<Button HorizontalAlignment="Left">Button 1 (Left)</Button>
<Button HorizontalAlignment="Right">Button 2 (Right)</Button>
<Button HorizontalAlignment="Center">Button 3 (Center)</Button>
<Button HorizontalAlignment="Stretch">Button 4 (Stretch)</Button>
8 are used to illustrate each of the various positioning properties that are detailed in this topic. Three
<Button HorizontalAlignment="Left">Button 1 (Left)</Button>
<Button HorizontalAlignment="Right">Button 2 (Right)</Button>
<Button HorizontalAlignment="Center">Button 3 (Center)</Button>
<Button HorizontalAlignment="Stretch">Button 4 (Stretch)</Button>
6 elements are used to demonstrate both the Margin and HorizontalAlignment properties.
<Window xmlns="https://github.com/avaloniaui"
        xmlns:x="http://schemas.microsoft.com/winfx/2006/xaml"
        x:Class="AvaloniaApplication2.MainWindow"
        Title="AvaloniaApplication2">
  <Border Background="LightBlue"
          BorderBrush="Black"
          BorderThickness="2"
          Padding="15">
    <StackPanel Background="White"
                HorizontalAlignment="Center"
                VerticalAlignment="Top">
      <TextBlock Margin="5,0"
                 FontSize="18"
                 HorizontalAlignment="Center">
        Alignment, Margin and Padding Sample
      </TextBlock>
      <Button HorizontalAlignment="Left" Margin="20">Button 1</Button>
      <Button HorizontalAlignment="Right" Margin="10">Button 2</Button>
      <Button HorizontalAlignment="Stretch">Button 3</Button>
    </StackPanel>
  </Border>
</Window>
The following diagram provides a close-up view of the various positioning properties that are used in the preceding sample. Subsequent sections in this topic describe in greater detail how to use each positioning property. Understanding Alignment PropertiesThe HorizontalAlignment and
<Button HorizontalAlignment="Left">Button 1 (Left)</Button>
<Button HorizontalAlignment="Right">Button 2 (Right)</Button>
<Button HorizontalAlignment="Center">Button 3 (Center)</Button>
<Button HorizontalAlignment="Stretch">Button 4 (Stretch)</Button>
0 properties describe how a child element should be positioned within a parent element's allocated layout space. By using these properties together, you can position child elements precisely. For example, child elements of a
<Border Background="LightBlue" BorderBrush="Black" BorderThickness="2" Padding="15">
    <Grid Background="White" ShowGridLines="True">
      <Grid.RowDefinitions>
        <RowDefinition Height="25"/>
        <RowDefinition Height="50"/>
        <RowDefinition Height="50"/>
        <RowDefinition Height="50"/>
        <RowDefinition Height="50"/>
      </Grid.RowDefinitions>
      <TextBlock Grid.Row="0" Grid.Column="0"
                 FontSize="18"
                 HorizontalAlignment="Center">
        VerticalAlignment Sample
      </TextBlock>
      <Button Grid.Row="1" Grid.Column="0" VerticalAlignment="Top">Button 1 (Top)</Button>
      <Button Grid.Row="2" Grid.Column="0" VerticalAlignment="Bottom">Button 2 (Bottom)</Button>
      <Button Grid.Row="3" Grid.Column="0" VerticalAlignment="Center">Button 3 (Center)</Button>
      <Button Grid.Row="4" Grid.Column="0" VerticalAlignment="Stretch">Button 4 (Stretch)</Button>
    </Grid>
</Border>
8 can specify four different horizontal alignments:
<Border Background="LightBlue" BorderBrush="Black" BorderThickness="2" Padding="15">
    <Grid Background="White" ShowGridLines="True">
      <Grid.RowDefinitions>
        <RowDefinition Height="25"/>
        <RowDefinition Height="50"/>
        <RowDefinition Height="50"/>
        <RowDefinition Height="50"/>
        <RowDefinition Height="50"/>
      </Grid.RowDefinitions>
      <TextBlock Grid.Row="0" Grid.Column="0"
                 FontSize="18"
                 HorizontalAlignment="Center">
        VerticalAlignment Sample
      </TextBlock>
      <Button Grid.Row="1" Grid.Column="0" VerticalAlignment="Top">Button 1 (Top)</Button>
      <Button Grid.Row="2" Grid.Column="0" VerticalAlignment="Bottom">Button 2 (Bottom)</Button>
      <Button Grid.Row="3" Grid.Column="0" VerticalAlignment="Center">Button 3 (Center)</Button>
      <Button Grid.Row="4" Grid.Column="0" VerticalAlignment="Stretch">Button 4 (Stretch)</Button>
    </Grid>
</Border>
9,
<Button Margin="10">Button 7</Button>
<Button Margin="10">Button 8</Button>
<Button Margin="10">Button 9</Button>
0,
<Button Margin="10">Button 7</Button>
<Button Margin="10">Button 8</Button>
<Button Margin="10">Button 9</Button>
1, or to
<Button Margin="10">Button 7</Button>
<Button Margin="10">Button 8</Button>
<Button Margin="10">Button 9</Button>
2 to fill available space. Similar values are available for vertical positioning. Explicitly set
<Button Margin="10">Button 7</Button>
<Button Margin="10">Button 8</Button>
<Button Margin="10">Button 9</Button>
3 and
<Button Margin="10">Button 7</Button>
<Button Margin="10">Button 8</Button>
<Button Margin="10">Button 9</Button>
4 properties on an element take precedence over the
<Button Margin="10">Button 7</Button>
<Button Margin="10">Button 8</Button>
<Button Margin="10">Button 9</Button>
2 property value. Attempting to set
<Button Margin="10">Button 7</Button>
<Button Margin="10">Button 8</Button>
<Button Margin="10">Button 9</Button>
3,
<Button Margin="10">Button 7</Button>
<Button Margin="10">Button 8</Button>
<Button Margin="10">Button 9</Button>
4, and a HorizontalAlignment value of
<Button Margin="10">Button 7</Button>
<Button Margin="10">Button 8</Button>
<Button Margin="10">Button 9</Button>
2 results in the
<Button Margin="10">Button 7</Button>
<Button Margin="10">Button 8</Button>
<Button Margin="10">Button 9</Button>
2 request being ignored. HorizontalAlignment PropertyThe HorizontalAlignment property declares the horizontal alignment characteristics to apply to child elements. The following table shows each of the possible values of the HorizontalAlignment property. MemberDescription
<Border Background="LightBlue" BorderBrush="Black" BorderThickness="2" Padding="15">
    <Grid Background="White" ShowGridLines="True">
      <Grid.RowDefinitions>
        <RowDefinition Height="25"/>
        <RowDefinition Height="50"/>
        <RowDefinition Height="50"/>
        <RowDefinition Height="50"/>
        <RowDefinition Height="50"/>
      </Grid.RowDefinitions>
      <TextBlock Grid.Row="0" Grid.Column="0"
                 FontSize="18"
                 HorizontalAlignment="Center">
        VerticalAlignment Sample
      </TextBlock>
      <Button Grid.Row="1" Grid.Column="0" VerticalAlignment="Top">Button 1 (Top)</Button>
      <Button Grid.Row="2" Grid.Column="0" VerticalAlignment="Bottom">Button 2 (Bottom)</Button>
      <Button Grid.Row="3" Grid.Column="0" VerticalAlignment="Center">Button 3 (Center)</Button>
      <Button Grid.Row="4" Grid.Column="0" VerticalAlignment="Stretch">Button 4 (Stretch)</Button>
    </Grid>
</Border>
9Child elements are aligned to the left of the parent element's allocated layout space.
<Button Margin="10">Button 7</Button>
<Button Margin="10">Button 8</Button>
<Button Margin="10">Button 9</Button>
1Child elements are aligned to the center of the parent element's allocated layout space.
<Button Margin="10">Button 7</Button>
<Button Margin="10">Button 8</Button>
<Button Margin="10">Button 9</Button>
0Child elements are aligned to the right of the parent element's allocated layout space.
<Button Margin="10">Button 7</Button>
<Button Margin="10">Button 8</Button>
<Button Margin="10">Button 9</Button>
2 (Default)Child elements are stretched to fill the parent element's allocated layout space. Explicit
<Button Margin="10">Button 7</Button>
<Button Margin="10">Button 8</Button>
<Button Margin="10">Button 9</Button>
4 and
<Button Margin="10">Button 7</Button>
<Button Margin="10">Button 8</Button>
<Button Margin="10">Button 9</Button>
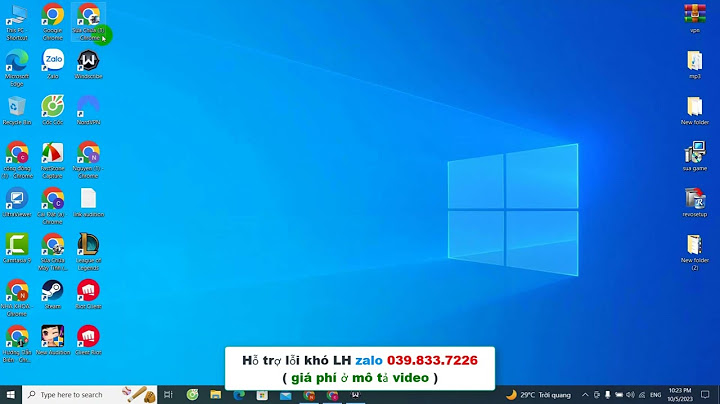
3 values take precedence. The following example shows how to apply the HorizontalAlignment property to
<Button HorizontalAlignment="Left">Button 1 (Left)</Button>
<Button HorizontalAlignment="Right">Button 2 (Right)</Button>
<Button HorizontalAlignment="Center">Button 3 (Center)</Button>
<Button HorizontalAlignment="Stretch">Button 4 (Stretch)</Button>
6 elements. Each attribute value is shown, to better illustrate the various rendering behaviors.
<Button HorizontalAlignment="Left">Button 1 (Left)</Button>
<Button HorizontalAlignment="Right">Button 2 (Right)</Button>
<Button HorizontalAlignment="Center">Button 3 (Center)</Button>
<Button HorizontalAlignment="Stretch">Button 4 (Stretch)</Button>
The preceding code yields a layout similar to the following image. The positioning effects of each HorizontalAlignment value are visible in the illustration. VerticalAlignment PropertyThe
<Button HorizontalAlignment="Left">Button 1 (Left)</Button>
<Button HorizontalAlignment="Right">Button 2 (Right)</Button>
<Button HorizontalAlignment="Center">Button 3 (Center)</Button>
<Button HorizontalAlignment="Stretch">Button 4 (Stretch)</Button>
0 property describes the vertical alignment characteristics to apply to child elements. The following table shows each of the possible values for the
<Button HorizontalAlignment="Left">Button 1 (Left)</Button>
<Button HorizontalAlignment="Right">Button 2 (Right)</Button>
<Button HorizontalAlignment="Center">Button 3 (Center)</Button>
<Button HorizontalAlignment="Stretch">Button 4 (Stretch)</Button>
0 property. MemberDescription
<Border Background="LightBlue"
        BorderBrush="Black"
        BorderThickness="2"
        CornerRadius="45"
        Padding="25">
4Child elements are aligned to the top of the parent element's allocated layout space.
<Button Margin="10">Button 7</Button>
<Button Margin="10">Button 8</Button>
<Button Margin="10">Button 9</Button>
1Child elements are aligned to the center of the parent element's allocated layout space.
<Border Background="LightBlue"
        BorderBrush="Black"
        BorderThickness="2"
        CornerRadius="45"
        Padding="25">
6Child elements are aligned to the bottom of the parent element's allocated layout space.
<Button Margin="10">Button 7</Button>
<Button Margin="10">Button 8</Button>
<Button Margin="10">Button 9</Button>
2 (Default)Child elements are stretched to fill the parent element's allocated layout space. Explicit
<Button Margin="10">Button 7</Button>
<Button Margin="10">Button 8</Button>
<Button Margin="10">Button 9</Button>
4 and
<Button Margin="10">Button 7</Button>
<Button Margin="10">Button 8</Button>
<Button Margin="10">Button 9</Button>
3 values take precedence. The following example shows how to apply the
<Button HorizontalAlignment="Left">Button 1 (Left)</Button>
<Button HorizontalAlignment="Right">Button 2 (Right)</Button>
<Button HorizontalAlignment="Center">Button 3 (Center)</Button>
<Button HorizontalAlignment="Stretch">Button 4 (Stretch)</Button>
0 property to
<Button HorizontalAlignment="Left">Button 1 (Left)</Button>
<Button HorizontalAlignment="Right">Button 2 (Right)</Button>
<Button HorizontalAlignment="Center">Button 3 (Center)</Button>
<Button HorizontalAlignment="Stretch">Button 4 (Stretch)</Button>
6 elements. Each attribute value is shown, to better illustrate the various rendering behaviors. For purposes of this sample, a
<Border Background="LightBlue"
        BorderBrush="Black"
        BorderThickness="2"
        CornerRadius="45"
        Padding="25">
    <Grid Background="White" ShowGridLines="True">
      <Grid.ColumnDefinitions>
        <ColumnDefinition Width="Auto"/>
        <ColumnDefinition Width="*"/>
        <ColumnDefinition Width="Auto"/>
      </Grid.ColumnDefinitions>

    <StackPanel Grid.Column="0" Grid.Row="0"
                HorizontalAlignment="Left"
                Name="StackPanel1"
                VerticalAlignment="Top">
        <TextBlock FontSize="18" HorizontalAlignment="Center" Margin="0,0,0,15">StackPanel1</TextBlock>
        <Button Margin="0,10,0,10">Button 1</Button>
        <Button Margin="0,10,0,10">Button 2</Button>
        <Button Margin="0,10,0,10">Button 3</Button>
        <TextBlock>ColumnDefinition.Width="Auto"</TextBlock>
        <TextBlock>StackPanel.HorizontalAlignment="Left"</TextBlock>
        <TextBlock>StackPanel.VerticalAlignment="Top"</TextBlock>
        <TextBlock>StackPanel.Orientation="Vertical"</TextBlock>
        <TextBlock>Button.Margin="0,10,0,10"</TextBlock>
    </StackPanel>

    <StackPanel Grid.Column="1" Grid.Row="0"
                HorizontalAlignment="Stretch"
                Name="StackPanel2"
                VerticalAlignment="Top"
                Orientation="Vertical">
        <TextBlock FontSize="18" HorizontalAlignment="Center" Margin="0,0,0,15">StackPanel2</TextBlock>
        <Button Margin="10,0,10,0">Button 4</Button>
        <Button Margin="10,0,10,0">Button 5</Button>
        <Button Margin="10,0,10,0">Button 6</Button>
        <TextBlock HorizontalAlignment="Center">ColumnDefinition.Width="*"</TextBlock>
        <TextBlock HorizontalAlignment="Center">StackPanel.HorizontalAlignment="Stretch"</TextBlock>
        <TextBlock HorizontalAlignment="Center">StackPanel.VerticalAlignment="Top"</TextBlock>
        <TextBlock HorizontalAlignment="Center">StackPanel.Orientation="Horizontal"</TextBlock>
        <TextBlock HorizontalAlignment="Center">Button.Margin="10,0,10,0"</TextBlock>
    </StackPanel>

    <StackPanel Grid.Column="2" Grid.Row="0"
                HorizontalAlignment="Left"
                Name="StackPanel3"
                VerticalAlignment="Top">
        <TextBlock FontSize="18" HorizontalAlignment="Center" Margin="0,0,0,15">StackPanel3</TextBlock>
        <Button Margin="10">Button 7</Button>
        <Button Margin="10">Button 8</Button>
        <Button Margin="10">Button 9</Button>
        <TextBlock>ColumnDefinition.Width="Auto"</TextBlock>
        <TextBlock>StackPanel.HorizontalAlignment="Left"</TextBlock>
        <TextBlock>StackPanel.VerticalAlignment="Top"</TextBlock>
        <TextBlock>StackPanel.Orientation="Vertical"</TextBlock>
        <TextBlock>Button.Margin="10"</TextBlock>
    </StackPanel>
  </Grid>
</Border>
2 element with visible gridlines is used as the parent, to better illustrate the layout behavior of each property value.
<Border Background="LightBlue" BorderBrush="Black" BorderThickness="2" Padding="15">
    <Grid Background="White" ShowGridLines="True">
      <Grid.RowDefinitions>
        <RowDefinition Height="25"/>
        <RowDefinition Height="50"/>
        <RowDefinition Height="50"/>
        <RowDefinition Height="50"/>
        <RowDefinition Height="50"/>
      </Grid.RowDefinitions>
      <TextBlock Grid.Row="0" Grid.Column="0"
                 FontSize="18"
                 HorizontalAlignment="Center">
        VerticalAlignment Sample
      </TextBlock>
      <Button Grid.Row="1" Grid.Column="0" VerticalAlignment="Top">Button 1 (Top)</Button>
      <Button Grid.Row="2" Grid.Column="0" VerticalAlignment="Bottom">Button 2 (Bottom)</Button>
      <Button Grid.Row="3" Grid.Column="0" VerticalAlignment="Center">Button 3 (Center)</Button>
      <Button Grid.Row="4" Grid.Column="0" VerticalAlignment="Stretch">Button 4 (Stretch)</Button>
    </Grid>
</Border>
The preceding code yields a layout similar to the following image. The positioning effects of each
<Button HorizontalAlignment="Left">Button 1 (Left)</Button>
<Button HorizontalAlignment="Right">Button 2 (Right)</Button>
<Button HorizontalAlignment="Center">Button 3 (Center)</Button>
<Button HorizontalAlignment="Stretch">Button 4 (Stretch)</Button>
0 value are visible in the illustration. Understanding Margin PropertiesThe Margin property describes the distance between an element and its child or peers. Margin values can be uniform, by using syntax like
<Border Background="LightBlue"
        BorderBrush="Black"
        BorderThickness="2"
        CornerRadius="45"
        Padding="25">
    <Grid Background="White" ShowGridLines="True">
      <Grid.ColumnDefinitions>
        <ColumnDefinition Width="Auto"/>
        <ColumnDefinition Width="*"/>
        <ColumnDefinition Width="Auto"/>
      </Grid.ColumnDefinitions>

    <StackPanel Grid.Column="0" Grid.Row="0"
                HorizontalAlignment="Left"
                Name="StackPanel1"
                VerticalAlignment="Top">
        <TextBlock FontSize="18" HorizontalAlignment="Center" Margin="0,0,0,15">StackPanel1</TextBlock>
        <Button Margin="0,10,0,10">Button 1</Button>
        <Button Margin="0,10,0,10">Button 2</Button>
        <Button Margin="0,10,0,10">Button 3</Button>
        <TextBlock>ColumnDefinition.Width="Auto"</TextBlock>
        <TextBlock>StackPanel.HorizontalAlignment="Left"</TextBlock>
        <TextBlock>StackPanel.VerticalAlignment="Top"</TextBlock>
        <TextBlock>StackPanel.Orientation="Vertical"</TextBlock>
        <TextBlock>Button.Margin="0,10,0,10"</TextBlock>
    </StackPanel>

    <StackPanel Grid.Column="1" Grid.Row="0"
                HorizontalAlignment="Stretch"
                Name="StackPanel2"
                VerticalAlignment="Top"
                Orientation="Vertical">
        <TextBlock FontSize="18" HorizontalAlignment="Center" Margin="0,0,0,15">StackPanel2</TextBlock>
        <Button Margin="10,0,10,0">Button 4</Button>
        <Button Margin="10,0,10,0">Button 5</Button>
        <Button Margin="10,0,10,0">Button 6</Button>
        <TextBlock HorizontalAlignment="Center">ColumnDefinition.Width="*"</TextBlock>
        <TextBlock HorizontalAlignment="Center">StackPanel.HorizontalAlignment="Stretch"</TextBlock>
        <TextBlock HorizontalAlignment="Center">StackPanel.VerticalAlignment="Top"</TextBlock>
        <TextBlock HorizontalAlignment="Center">StackPanel.Orientation="Horizontal"</TextBlock>
        <TextBlock HorizontalAlignment="Center">Button.Margin="10,0,10,0"</TextBlock>
    </StackPanel>

    <StackPanel Grid.Column="2" Grid.Row="0"
                HorizontalAlignment="Left"
                Name="StackPanel3"
                VerticalAlignment="Top">
        <TextBlock FontSize="18" HorizontalAlignment="Center" Margin="0,0,0,15">StackPanel3</TextBlock>
        <Button Margin="10">Button 7</Button>
        <Button Margin="10">Button 8</Button>
        <Button Margin="10">Button 9</Button>
        <TextBlock>ColumnDefinition.Width="Auto"</TextBlock>
        <TextBlock>StackPanel.HorizontalAlignment="Left"</TextBlock>
        <TextBlock>StackPanel.VerticalAlignment="Top"</TextBlock>
        <TextBlock>StackPanel.Orientation="Vertical"</TextBlock>
        <TextBlock>Button.Margin="10"</TextBlock>
    </StackPanel>
  </Grid>
</Border>
6. With this syntax, a uniform Margin of 20 device independent pixels would be applied to the element. Margin values can also take the form of four distinct values, each value describing a distinct margin to apply to the left, top, right, and bottom (in that order), like
<Border Background="LightBlue"
        BorderBrush="Black"
        BorderThickness="2"
        CornerRadius="45"
        Padding="25">
    <Grid Background="White" ShowGridLines="True">
      <Grid.ColumnDefinitions>
        <ColumnDefinition Width="Auto"/>
        <ColumnDefinition Width="*"/>
        <ColumnDefinition Width="Auto"/>
      </Grid.ColumnDefinitions>

    <StackPanel Grid.Column="0" Grid.Row="0"
                HorizontalAlignment="Left"
                Name="StackPanel1"
                VerticalAlignment="Top">
        <TextBlock FontSize="18" HorizontalAlignment="Center" Margin="0,0,0,15">StackPanel1</TextBlock>
        <Button Margin="0,10,0,10">Button 1</Button>
        <Button Margin="0,10,0,10">Button 2</Button>
        <Button Margin="0,10,0,10">Button 3</Button>
        <TextBlock>ColumnDefinition.Width="Auto"</TextBlock>
        <TextBlock>StackPanel.HorizontalAlignment="Left"</TextBlock>
        <TextBlock>StackPanel.VerticalAlignment="Top"</TextBlock>
        <TextBlock>StackPanel.Orientation="Vertical"</TextBlock>
        <TextBlock>Button.Margin="0,10,0,10"</TextBlock>
    </StackPanel>

    <StackPanel Grid.Column="1" Grid.Row="0"
                HorizontalAlignment="Stretch"
                Name="StackPanel2"
                VerticalAlignment="Top"
                Orientation="Vertical">
        <TextBlock FontSize="18" HorizontalAlignment="Center" Margin="0,0,0,15">StackPanel2</TextBlock>
        <Button Margin="10,0,10,0">Button 4</Button>
        <Button Margin="10,0,10,0">Button 5</Button>
        <Button Margin="10,0,10,0">Button 6</Button>
        <TextBlock HorizontalAlignment="Center">ColumnDefinition.Width="*"</TextBlock>
        <TextBlock HorizontalAlignment="Center">StackPanel.HorizontalAlignment="Stretch"</TextBlock>
        <TextBlock HorizontalAlignment="Center">StackPanel.VerticalAlignment="Top"</TextBlock>
        <TextBlock HorizontalAlignment="Center">StackPanel.Orientation="Horizontal"</TextBlock>
        <TextBlock HorizontalAlignment="Center">Button.Margin="10,0,10,0"</TextBlock>
    </StackPanel>

    <StackPanel Grid.Column="2" Grid.Row="0"
                HorizontalAlignment="Left"
                Name="StackPanel3"
                VerticalAlignment="Top">
        <TextBlock FontSize="18" HorizontalAlignment="Center" Margin="0,0,0,15">StackPanel3</TextBlock>
        <Button Margin="10">Button 7</Button>
        <Button Margin="10">Button 8</Button>
        <Button Margin="10">Button 9</Button>
        <TextBlock>ColumnDefinition.Width="Auto"</TextBlock>
        <TextBlock>StackPanel.HorizontalAlignment="Left"</TextBlock>
        <TextBlock>StackPanel.VerticalAlignment="Top"</TextBlock>
        <TextBlock>StackPanel.Orientation="Vertical"</TextBlock>
        <TextBlock>Button.Margin="10"</TextBlock>
    </StackPanel>
  </Grid>
</Border>
9. Proper use of the Margin property enables very fine control of an element's rendering position and the rendering position of its neighbor elements and children. A non-zero margin applies space outside the element's `HorizontalAlignment`1. The following example shows how to apply uniform margins around a group of
<Button HorizontalAlignment="Left">Button 1 (Left)</Button>
<Button HorizontalAlignment="Right">Button 2 (Right)</Button>
<Button HorizontalAlignment="Center">Button 3 (Center)</Button>
<Button HorizontalAlignment="Stretch">Button 4 (Stretch)</Button>
6 elements. The
<Button HorizontalAlignment="Left">Button 1 (Left)</Button>
<Button HorizontalAlignment="Right">Button 2 (Right)</Button>
<Button HorizontalAlignment="Center">Button 3 (Center)</Button>
<Button HorizontalAlignment="Stretch">Button 4 (Stretch)</Button>
6 elements are spaced evenly with a ten-pixel margin buffer in each direction.
<Button Margin="10">Button 7</Button>
<Button Margin="10">Button 8</Button>
<Button Margin="10">Button 9</Button>
In many instances, a uniform margin is not appropriate. In these cases, non-uniform spacing can be applied. The following example shows how to apply non-uniform margin spacing to child elements. Margins are described in this order: left, top, right, bottom.
<Button Margin="0,10,0,10">Button 1</Button>
<Button Margin="0,10,0,10">Button 2</Button>
<Button Margin="0,10,0,10">Button 3</Button>
Understanding the Padding PropertyPadding is similar to Margin in most respects. The Padding property is exposed on only on a few classes, primarily as a convenience:
<Button HorizontalAlignment="Left">Button 1 (Left)</Button>
<Button HorizontalAlignment="Right">Button 2 (Right)</Button>
<Button HorizontalAlignment="Center">Button 3 (Center)</Button>
<Button HorizontalAlignment="Stretch">Button 4 (Stretch)</Button>
7, HorizontalAlignment`6, and `HorizontalAlignment`7 are samples of classes that expose a Padding property. The `Padding property enlarges the effective size of a child element by the specified `HorizontalAlignment`9 value. The following example shows how to apply Padding to a parent
<Button HorizontalAlignment="Left">Button 1 (Left)</Button>
<Button HorizontalAlignment="Right">Button 2 (Right)</Button>
<Button HorizontalAlignment="Center">Button 3 (Center)</Button>
<Button HorizontalAlignment="Stretch">Button 4 (Stretch)</Button>
7 element.
<Border Background="LightBlue"
        BorderBrush="Black"
        BorderThickness="2"
        CornerRadius="45"
        Padding="25">
Using Alignment, Margins, and Padding in an ApplicationHorizontalAlignment, Margin, Padding, and
<Button HorizontalAlignment="Left">Button 1 (Left)</Button>
<Button HorizontalAlignment="Right">Button 2 (Right)</Button>
<Button HorizontalAlignment="Center">Button 3 (Center)</Button>
<Button HorizontalAlignment="Stretch">Button 4 (Stretch)</Button>
0 provide the positioning control necessary to create a complex UI. You can use the effects of each property to change child-element positioning, enabling flexibility in creating dynamic applications and user experiences. The following example demonstrates each of the concepts that are detailed in this topic. Building on the infrastructure found in the first sample in this topic, this example adds a
<Border Background="LightBlue"
        BorderBrush="Black"
        BorderThickness="2"
        CornerRadius="45"
        Padding="25">
    <Grid Background="White" ShowGridLines="True">
      <Grid.ColumnDefinitions>
        <ColumnDefinition Width="Auto"/>
        <ColumnDefinition Width="*"/>
        <ColumnDefinition Width="Auto"/>
      </Grid.ColumnDefinitions>

    <StackPanel Grid.Column="0" Grid.Row="0"
                HorizontalAlignment="Left"
                Name="StackPanel1"
                VerticalAlignment="Top">
        <TextBlock FontSize="18" HorizontalAlignment="Center" Margin="0,0,0,15">StackPanel1</TextBlock>
        <Button Margin="0,10,0,10">Button 1</Button>
        <Button Margin="0,10,0,10">Button 2</Button>
        <Button Margin="0,10,0,10">Button 3</Button>
        <TextBlock>ColumnDefinition.Width="Auto"</TextBlock>
        <TextBlock>StackPanel.HorizontalAlignment="Left"</TextBlock>
        <TextBlock>StackPanel.VerticalAlignment="Top"</TextBlock>
        <TextBlock>StackPanel.Orientation="Vertical"</TextBlock>
        <TextBlock>Button.Margin="0,10,0,10"</TextBlock>
    </StackPanel>

    <StackPanel Grid.Column="1" Grid.Row="0"
                HorizontalAlignment="Stretch"
                Name="StackPanel2"
                VerticalAlignment="Top"
                Orientation="Vertical">
        <TextBlock FontSize="18" HorizontalAlignment="Center" Margin="0,0,0,15">StackPanel2</TextBlock>
        <Button Margin="10,0,10,0">Button 4</Button>
        <Button Margin="10,0,10,0">Button 5</Button>
        <Button Margin="10,0,10,0">Button 6</Button>
        <TextBlock HorizontalAlignment="Center">ColumnDefinition.Width="*"</TextBlock>
        <TextBlock HorizontalAlignment="Center">StackPanel.HorizontalAlignment="Stretch"</TextBlock>
        <TextBlock HorizontalAlignment="Center">StackPanel.VerticalAlignment="Top"</TextBlock>
        <TextBlock HorizontalAlignment="Center">StackPanel.Orientation="Horizontal"</TextBlock>
        <TextBlock HorizontalAlignment="Center">Button.Margin="10,0,10,0"</TextBlock>
    </StackPanel>

    <StackPanel Grid.Column="2" Grid.Row="0"
                HorizontalAlignment="Left"
                Name="StackPanel3"
                VerticalAlignment="Top">
        <TextBlock FontSize="18" HorizontalAlignment="Center" Margin="0,0,0,15">StackPanel3</TextBlock>
        <Button Margin="10">Button 7</Button>
        <Button Margin="10">Button 8</Button>
        <Button Margin="10">Button 9</Button>
        <TextBlock>ColumnDefinition.Width="Auto"</TextBlock>
        <TextBlock>StackPanel.HorizontalAlignment="Left"</TextBlock>
        <TextBlock>StackPanel.VerticalAlignment="Top"</TextBlock>
        <TextBlock>StackPanel.Orientation="Vertical"</TextBlock>
        <TextBlock>Button.Margin="10"</TextBlock>
    </StackPanel>
  </Grid>
</Border>
2 element as a child of the
<Button HorizontalAlignment="Left">Button 1 (Left)</Button>
<Button HorizontalAlignment="Right">Button 2 (Right)</Button>
<Button HorizontalAlignment="Center">Button 3 (Center)</Button>
<Button HorizontalAlignment="Stretch">Button 4 (Stretch)</Button>
7 in the first sample. Padding is applied to the parent
<Button HorizontalAlignment="Left">Button 1 (Left)</Button>
<Button HorizontalAlignment="Right">Button 2 (Right)</Button>
<Button HorizontalAlignment="Center">Button 3 (Center)</Button>
<Button HorizontalAlignment="Stretch">Button 4 (Stretch)</Button>
7 element. The
<Border Background="LightBlue"
        BorderBrush="Black"
        BorderThickness="2"
        CornerRadius="45"
        Padding="25">
    <Grid Background="White" ShowGridLines="True">
      <Grid.ColumnDefinitions>
        <ColumnDefinition Width="Auto"/>
        <ColumnDefinition Width="*"/>
        <ColumnDefinition Width="Auto"/>
      </Grid.ColumnDefinitions>

    <StackPanel Grid.Column="0" Grid.Row="0"
                HorizontalAlignment="Left"
                Name="StackPanel1"
                VerticalAlignment="Top">
        <TextBlock FontSize="18" HorizontalAlignment="Center" Margin="0,0,0,15">StackPanel1</TextBlock>
        <Button Margin="0,10,0,10">Button 1</Button>
        <Button Margin="0,10,0,10">Button 2</Button>
        <Button Margin="0,10,0,10">Button 3</Button>
        <TextBlock>ColumnDefinition.Width="Auto"</TextBlock>
        <TextBlock>StackPanel.HorizontalAlignment="Left"</TextBlock>
        <TextBlock>StackPanel.VerticalAlignment="Top"</TextBlock>
        <TextBlock>StackPanel.Orientation="Vertical"</TextBlock>
        <TextBlock>Button.Margin="0,10,0,10"</TextBlock>
    </StackPanel>

    <StackPanel Grid.Column="1" Grid.Row="0"
                HorizontalAlignment="Stretch"
                Name="StackPanel2"
                VerticalAlignment="Top"
                Orientation="Vertical">
        <TextBlock FontSize="18" HorizontalAlignment="Center" Margin="0,0,0,15">StackPanel2</TextBlock>
        <Button Margin="10,0,10,0">Button 4</Button>
        <Button Margin="10,0,10,0">Button 5</Button>
        <Button Margin="10,0,10,0">Button 6</Button>
        <TextBlock HorizontalAlignment="Center">ColumnDefinition.Width="*"</TextBlock>
        <TextBlock HorizontalAlignment="Center">StackPanel.HorizontalAlignment="Stretch"</TextBlock>
        <TextBlock HorizontalAlignment="Center">StackPanel.VerticalAlignment="Top"</TextBlock>
        <TextBlock HorizontalAlignment="Center">StackPanel.Orientation="Horizontal"</TextBlock>
        <TextBlock HorizontalAlignment="Center">Button.Margin="10,0,10,0"</TextBlock>
    </StackPanel>

    <StackPanel Grid.Column="2" Grid.Row="0"
                HorizontalAlignment="Left"
                Name="StackPanel3"
                VerticalAlignment="Top">
        <TextBlock FontSize="18" HorizontalAlignment="Center" Margin="0,0,0,15">StackPanel3</TextBlock>
        <Button Margin="10">Button 7</Button>
        <Button Margin="10">Button 8</Button>
        <Button Margin="10">Button 9</Button>
        <TextBlock>ColumnDefinition.Width="Auto"</TextBlock>
        <TextBlock>StackPanel.HorizontalAlignment="Left"</TextBlock>
        <TextBlock>StackPanel.VerticalAlignment="Top"</TextBlock>
        <TextBlock>StackPanel.Orientation="Vertical"</TextBlock>
        <TextBlock>Button.Margin="10"</TextBlock>
    </StackPanel>
  </Grid>
</Border>
2 is used to partition space between three child
<Button HorizontalAlignment="Left">Button 1 (Left)</Button>
<Button HorizontalAlignment="Right">Button 2 (Right)</Button>
<Button HorizontalAlignment="Center">Button 3 (Center)</Button>
<Button HorizontalAlignment="Stretch">Button 4 (Stretch)</Button>
8 elements.
<Button HorizontalAlignment="Left">Button 1 (Left)</Button>
<Button HorizontalAlignment="Right">Button 2 (Right)</Button>
<Button HorizontalAlignment="Center">Button 3 (Center)</Button>
<Button HorizontalAlignment="Stretch">Button 4 (Stretch)</Button>
6 elements are again used to show the various effects of Margin and HorizontalAlignment. `HorizontalAlignment`7 elements are added to each `Padding`6 to better define the various properties applied to the
<Button HorizontalAlignment="Left">Button 1 (Left)</Button>
<Button HorizontalAlignment="Right">Button 2 (Right)</Button>
<Button HorizontalAlignment="Center">Button 3 (Center)</Button>
<Button HorizontalAlignment="Stretch">Button 4 (Stretch)</Button>
6 elements in each column.
<Border Background="LightBlue"
        BorderBrush="Black"
        BorderThickness="2"
        CornerRadius="45"
        Padding="25">
    <Grid Background="White" ShowGridLines="True">
      <Grid.ColumnDefinitions>
        <ColumnDefinition Width="Auto"/>
        <ColumnDefinition Width="*"/>
        <ColumnDefinition Width="Auto"/>
      </Grid.ColumnDefinitions>

    <StackPanel Grid.Column="0" Grid.Row="0"
                HorizontalAlignment="Left"
                Name="StackPanel1"
                VerticalAlignment="Top">
        <TextBlock FontSize="18" HorizontalAlignment="Center" Margin="0,0,0,15">StackPanel1</TextBlock>
        <Button Margin="0,10,0,10">Button 1</Button>
        <Button Margin="0,10,0,10">Button 2</Button>
        <Button Margin="0,10,0,10">Button 3</Button>
        <TextBlock>ColumnDefinition.Width="Auto"</TextBlock>
        <TextBlock>StackPanel.HorizontalAlignment="Left"</TextBlock>
        <TextBlock>StackPanel.VerticalAlignment="Top"</TextBlock>
        <TextBlock>StackPanel.Orientation="Vertical"</TextBlock>
        <TextBlock>Button.Margin="0,10,0,10"</TextBlock>
    </StackPanel>

    <StackPanel Grid.Column="1" Grid.Row="0"
                HorizontalAlignment="Stretch"
                Name="StackPanel2"
                VerticalAlignment="Top"
                Orientation="Vertical">
        <TextBlock FontSize="18" HorizontalAlignment="Center" Margin="0,0,0,15">StackPanel2</TextBlock>
        <Button Margin="10,0,10,0">Button 4</Button>
        <Button Margin="10,0,10,0">Button 5</Button>
        <Button Margin="10,0,10,0">Button 6</Button>
        <TextBlock HorizontalAlignment="Center">ColumnDefinition.Width="*"</TextBlock>
        <TextBlock HorizontalAlignment="Center">StackPanel.HorizontalAlignment="Stretch"</TextBlock>
        <TextBlock HorizontalAlignment="Center">StackPanel.VerticalAlignment="Top"</TextBlock>
        <TextBlock HorizontalAlignment="Center">StackPanel.Orientation="Horizontal"</TextBlock>
        <TextBlock HorizontalAlignment="Center">Button.Margin="10,0,10,0"</TextBlock>
    </StackPanel>

    <StackPanel Grid.Column="2" Grid.Row="0"
                HorizontalAlignment="Left"
                Name="StackPanel3"
                VerticalAlignment="Top">
        <TextBlock FontSize="18" HorizontalAlignment="Center" Margin="0,0,0,15">StackPanel3</TextBlock>
        <Button Margin="10">Button 7</Button>
        <Button Margin="10">Button 8</Button>
        <Button Margin="10">Button 9</Button>
        <TextBlock>ColumnDefinition.Width="Auto"</TextBlock>
        <TextBlock>StackPanel.HorizontalAlignment="Left"</TextBlock>
        <TextBlock>StackPanel.VerticalAlignment="Top"</TextBlock>
        <TextBlock>StackPanel.Orientation="Vertical"</TextBlock>
        <TextBlock>Button.Margin="10"</TextBlock>
    </StackPanel>
  </Grid>
</Border>
When compiled, the preceding application yields a UI that looks like the following illustration. The effects of the various property values are evident in the spacing between elements, and significant property values for elements in each column are shown within `HorizontalAlignment`7 elements. How do you align elements to the right in XAML?Select the elements that you want to align. You can select more than one element by pressing and holding the Ctrl key while you select the elements. Select one of the following properties under HorizontalAlignment in the Layout section of the Properties window: Left, Center, Right, or Stretch. How do you get the parent control in WPF?To use it, simple call the FindParent<T> method, where T is the type you are looking for, and then passing in the control in which you want to the parent of. _parentContentPane. What is the flow direction of a StackPanel?The default stack direction in a StackPanel is vertical. To control content flow in a StackPanel, use the Orientation property. You can control horizontal alignment by using the HorizontalAlignment property. What is the Margin in WPF?The Margin property describes the distance between an element and its child or peers. Margin values can be uniform, by using syntax like Margin="20" . With this syntax, a uniform Margin of 20 device independent pixels would be applied to the element. |